What Should Be Documented During Framing, Plumbing, Electrical, and HVAC Rough-Ins?
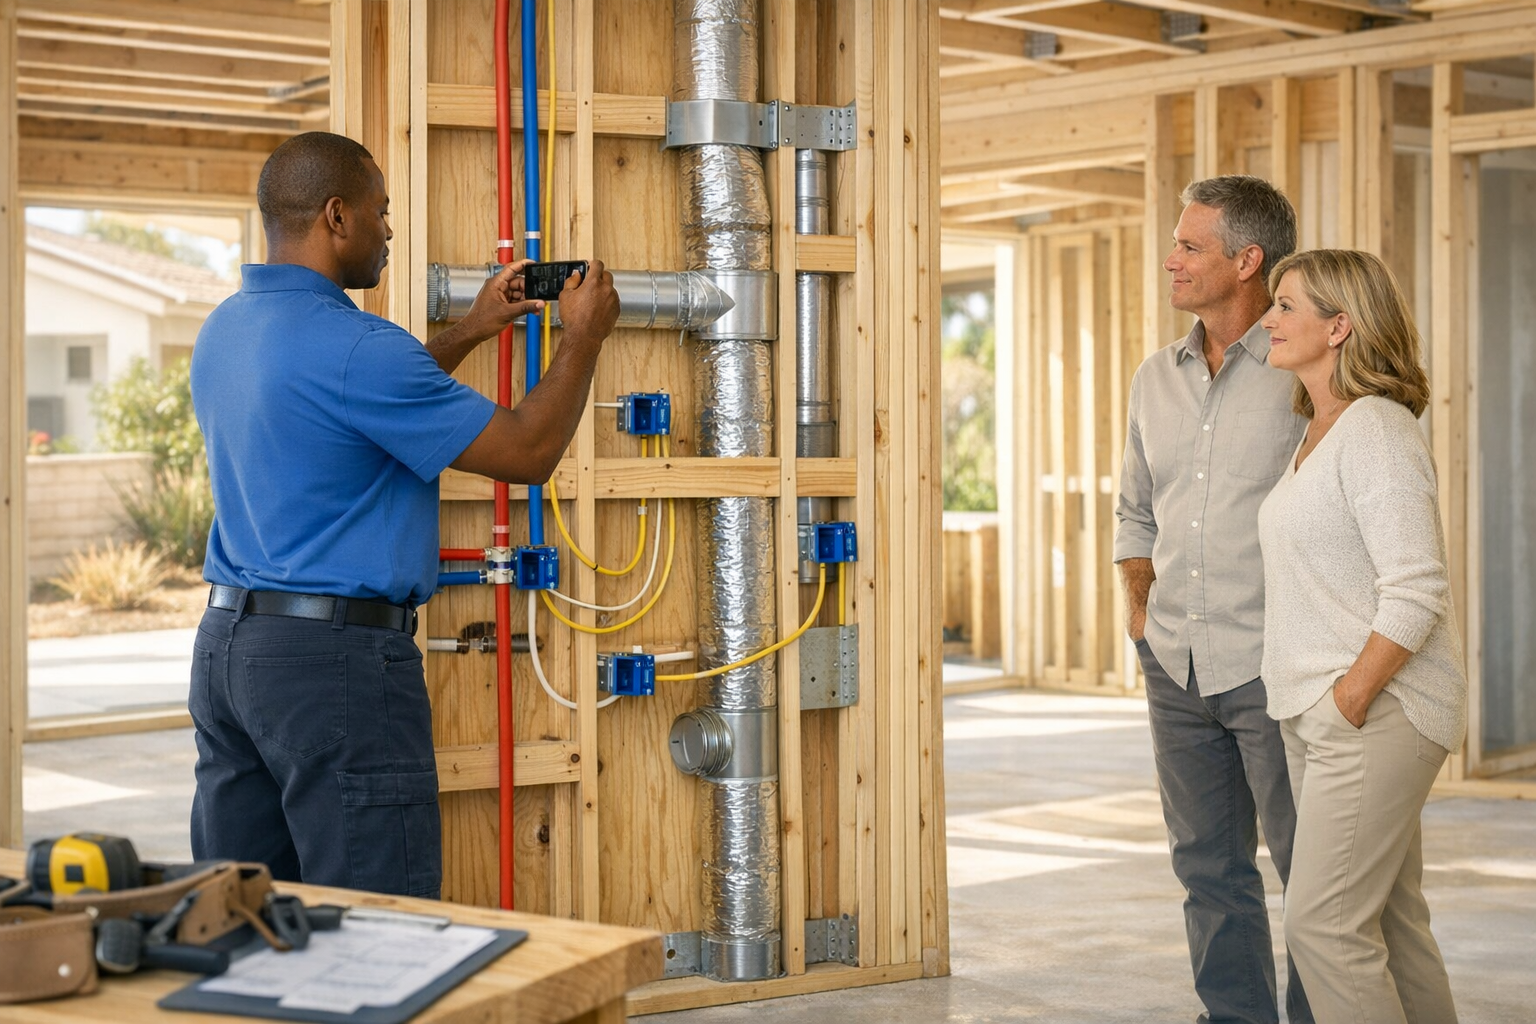
What Should Be Documented During Framing, Plumbing, Electrical, and HVAC Rough-Ins?
Every framing member, pipe run, wire path, and duct connection in your rebuild needs to be photographed, measured, and recorded before insulation and drywall seal them out of sight. Once walls are closed, confirming what was built behind them requires opening them back up — and that means added time, expense, and disruption that no homeowner should face after already losing a home to wildfire.
For homeowners in Altadena and Pacific Palisades rebuilding after wildfire, this documentation window carries real weight. Rough-in records become part of the permanent project file that supports inspection approvals, insurance claim documentation, warranty coverage, and your own confidence that the work hidden behind the walls was done correctly. When a contractor fails to capture these records at every phase, critical evidence is gone the moment drywall goes up.
This guide covers what should be documented at each rough-in stage — framing, plumbing, electrical, and HVAC — why each record matters, and what a well-managed documentation process looks like during a fire damage reconstruction.
Why the Pre-Drywall Window Is the Most Critical Documentation Opportunity in a Fire Rebuild
What "Rough-In" Means and When This Window Opens
A rough-in is the construction phase during which mechanical, electrical, and plumbing systems are installed inside framed walls, floors, and ceilings — but before insulation, vapor barriers, and drywall cover them. Framing itself is the structural skeleton that comes first and supports all rough-in work that follows.
The documentation window opens as soon as framing is complete and each trade finishes its portion of the installation. It closes the moment insulation or drywall is applied. In most residential rebuilds, this window spans days, not weeks. Missing it means losing the ability to visually confirm what was installed, how it was routed, and whether it aligns with the approved plans.
What Documentation Actually Accomplishes
Rough-in documentation serves four distinct purposes, each of which matters directly to the homeowner:
- Inspection readiness. Photographs and written records help confirm that work was completed before inspectors arrive and provide a reference point if corrections are needed.
- Insurance claim support. In a fire rebuild funded through an insurance claim, documented progress at each phase helps substantiate the scope and quality of work performed. Your carrier or adjuster may request this documentation at various points in the claim process.
- Warranty and future repair reference. Years down the road, if a pipe leaks inside a wall or a circuit trips without an obvious cause, rough-in photos showing the precise locations of supply lines, junction boxes, and duct connections can save significant time and cost during diagnosis.
- As-built accuracy. Approved plans show what was intended. As-built documentation shows what was actually constructed. Field adjustments happen on every project — a pipe shifts a few inches to clear a structural member, a duct route changes due to clearance constraints. Capturing those changes produces an accurate permanent record of the home as it was actually built.
Why Fire Damage Rebuilds Raise the Documentation Stakes
In a standard new construction project, thorough rough-in documentation is good practice. In a fire damage reconstruction, it carries additional significance for several reasons:
- The home's original construction records may have been destroyed in the fire, making the rebuild documentation the only permanent record of the home's structural and mechanical systems.
- Insurance-funded projects often require documented proof of completed work at each phase, particularly when claim payments are tied to construction milestones.
- Fire rebuilds in Altadena and Pacific Palisades may involve updated code requirements — including current California Building Code provisions and Title 24 energy standards — that differ from what was in place when the home was originally built. Documenting compliance with current standards matters for final approval and for the homeowner's long-term protection.
- When a home has been substantially reconstructed, the as-built documentation package becomes a meaningful asset for future resale, refinancing, or any situation where the construction quality of the rebuilt home needs to be demonstrated.
What to Document During Framing
Framing is the structural backbone for everything that follows. Documentation at this stage captures the load-bearing framework, connection details, and blocking that will be permanently hidden once the project moves forward.
Structural Framing Elements
- Stud layout and spacing. Photograph wall sections showing stud spacing (typically 16 inches or 24 inches on center). Include a tape measure in the frame for reference.
- Headers and beams. Capture header sizes above windows, doors, and openings. Record beam dimensions and connection hardware. These details confirm that structural loads are being carried as designed.
- Bearing walls and posts. Identify and document all bearing walls and structural posts. If the project involved engineering directives following a fire damage assessment, these elements should match the structural engineer's specifications.
Seismic Connections and Hold-Downs
California requires specific seismic hardware — including hold-downs, anchor bolts, metal ties, and structural strapping — to connect framing to the foundation and link structural elements together. In a wildfire rebuild, these connections are installed new and should be documented with close-up photographs showing bolt placement, strap routing, and hardware type. This is particularly relevant in Altadena and Pacific Palisades, where local building departments verify seismic compliance during framing inspections.
Shear Walls and Fastening Patterns
Shear wall panels resist lateral forces during seismic events. Document shear wall locations, the type of sheathing installed, and the nailing or fastening pattern used. Inspectors in Los Angeles County typically verify nailing schedules on shear panels, and photographic records provide a backup reference if questions come up later.
Backing, Blocking, and Nailers
Backing and blocking consist of short lumber pieces installed between studs to support items that will be mounted after drywall is in place — cabinets, grab bars, towel bars, TV mounts, heavy mirrors, and wall-mounted fixtures. Once drywall covers them, their locations are invisible without documentation. Photograph every blocking location with a tape measure showing its height and position relative to a fixed reference such as a corner or door opening.
Fire Blocking and Draft Stopping
Fire blocking is required by code at specific locations — between floor levels, at soffits, in chases, and around penetrations — to limit fire and smoke movement through concealed wall and ceiling cavities. Draft stopping serves a comparable function in larger concealed spaces such as dropped ceilings and floor-ceiling assemblies. In a fire rebuild, these elements go beyond code compliance. They are direct safety measures that help protect the rebuilt home from the same category of risk that caused the original loss. Document their locations and the materials used.
Notched and Drilled Framing Members
When plumbers and electricians route pipes and wires through studs and joists, they drill holes or cut notches. Building codes restrict the size and placement of these penetrations to preserve structural integrity. Photograph any notched or drilled framing members — particularly in load-bearing walls and floor joists — so there is a record confirming that penetrations were within allowable limits at the time of inspection.
What to Document During Plumbing Rough-In
Plumbing rough-in establishes the supply lines, drain-waste-vent (DWV) piping, and gas lines that will serve every fixture in the home. Once concealed, these systems are among the most costly to access when a problem develops.
Supply Line Routing
Photograph the routing of hot and cold water supply lines through walls and floors. Include measurements from fixed reference points — a corner, a stud face, the subfloor — so the exact location of each line can be identified later without opening the wall. Record the pipe material (copper, PEX, CPVC) and note any transition fittings.
Drain-Waste-Vent Pipe Routing and Cleanout Locations
DWV piping removes wastewater and admits air into the system to maintain proper drainage flow. Document the routing of all drain and vent pipes, including pipe sizes, slope direction, and the locations of every cleanout access point. Cleanout locations deserve particular attention because they are the access points for clearing future blockages — and once walls and floors are finished, those locations become completely invisible without a record.
Fixture Rough-In Positions
Record the precise positions of shower valve rough-ins, toilet flanges, sink supply and drain stub-outs, and tub or shower drains. Include measurements from surrounding walls. These positions determine whether finish fixtures will align correctly, and they serve as a reference if a fixture needs replacement or a leak develops behind the wall in the future.
Pressure Test Documentation
Before walls are closed, the plumbing system is pressure-tested to confirm that joints are properly sealed and lines hold pressure without leaking. Photograph the pressure gauge during the test, capturing the pressure reading and a visible time stamp. A passing pressure test backed by a dated photo is a straightforward but valuable record that can support both the inspection process and any future warranty discussion regarding the plumbing system's condition at installation.
Gas Line Routing and Shutoff Locations
When the home includes gas-fired appliances — furnace, water heater, cooktop, fireplace — the gas line routing and shutoff valve locations should be photographed and mapped. Gas piping locations are safety-critical information that should be accessible without opening walls. Record the pipe material, connection points, and the position of each shutoff valve relative to the appliance it serves.
What to Document During Electrical Rough-In
Electrical rough-in installs the wiring, boxes, and conduit pathways that will power every circuit, outlet, switch, and connected system in the home. This phase covers both standard power wiring and low-voltage systems.
Circuit Wiring Paths
Photograph the routing of all electrical wiring through walls, ceilings, and floors. Record the wire type (Romex/NM cable, armored cable, conduit) and the path each circuit follows from the panel to its endpoint. This information is useful for future troubleshooting or renovation work and helps pinpoint exactly where wires run inside finished walls.
Outlet, Switch, and Junction Box Positions
Record the height and horizontal position of every outlet, switch, and junction box. Measure from the floor and from the nearest corner or door frame. Junction boxes warrant particular attention because code requires that every junction box remain accessible after construction — if one gets buried behind drywall without documentation, it creates both a code violation and a fire safety issue.
Panel Layout and Circuit Labeling
Photograph the main electrical panel showing the breaker layout, circuit assignments, and wire connections. A clear panel photo taken during rough-in — before the panel is fully dressed — provides a more detailed reference than the finished panel label alone. Record which circuits serve which areas of the home.
AFCI and GFCI Circuit Locations
Current California electrical code requires arc-fault circuit interrupter (AFCI) protection in most habitable rooms and ground-fault circuit interrupter (GFCI) protection in kitchens, bathrooms, garages, outdoor areas, and other wet or exposed locations. Document which circuits include AFCI or GFCI protection and where that protection is located — at the panel, at the first outlet in the circuit, or both. In a fire rebuild, AFCI protection is a meaningful safety improvement, and documenting its installation supports both code compliance and the homeowner's long-term safety record.
Low-Voltage Wiring
Low-voltage systems — including structured Ethernet cabling, coaxial cable, security system wiring, doorbell wiring, and audio/visual prewire — are installed during electrical rough-in but are frequently documented with less rigor than power wiring. These systems are just as inaccessible after drywall. Photograph the routing of all low-voltage runs, the locations of low-voltage boxes and distribution panels, and the termination points for each system.
Smoke and Carbon Monoxide Detector Locations
Document the rough-in locations for hardwired smoke detectors and carbon monoxide detectors. California requires interconnected hardwired detectors in designated locations throughout the home. Recording these positions during rough-in confirms placement before drywall and provides a permanent reference for future maintenance or device replacement.
What to Document During HVAC Rough-In
HVAC rough-in installs the ductwork, refrigerant lines, flue connections, and exhaust pathways that heat, cool, and ventilate the home. These systems extend across walls, floors, ceilings, and attic spaces, making them among the most thoroughly concealed components in any rebuild.
Supply and Return Duct Routing
Photograph the routing of all supply and return ducts — trunk lines, branch ducts, and flex duct connections. Capture duct sizes, connection points, and the path from the air handler or furnace to each register location. Note where ducts pass through walls, floors, and ceilings. These routes become invisible after insulation and drywall are installed, and locating them later without documentation requires making exploratory cuts.
Equipment Locations
Document the installed locations of the air handler, furnace, condenser unit, and any mini-split heads or cassettes. Include refrigerant line set routing from the outdoor unit to the indoor equipment, showing the path through walls or chases. Record equipment model and serial numbers — this information supports warranty registration and simplifies future service calls.
Damper, Filter, and Access Door Locations
Zone dampers, balancing dampers, filter racks, and access doors all need to remain reachable after construction is complete. Document their locations during rough-in so that future maintenance access is preserved and anyone servicing the system can find these components without guesswork.
Combustion Flue and Exhaust Vent Routing
When the home includes gas-fired HVAC equipment or a gas water heater, document the routing of combustion flue pipes and exhaust vents through the building envelope. Record clearances from combustible materials and the penetration locations through walls and roof. These are fire-safety-critical details that belong in the permanent record.
Bathroom and Dryer Exhaust Duct Routing
Bathroom exhaust fans and dryer vents route through walls, ceilings, and roof spaces. Document the full path from the fan or dryer connection to the exterior termination point. Improperly routed or disconnected exhaust ducts are a frequent source of moisture damage and indoor air quality issues — problems that are entirely hidden once construction wraps up.
Title 24 Duct Sealing and Insulation Documentation
California's Title 24 energy standards include specific requirements for duct sealing and insulation, particularly for ducts routed through unconditioned spaces such as attics and crawlspaces. These requirements may differ from what was in place when the home was originally constructed. Documenting duct sealing methods, insulation type, and insulation coverage during rough-in supports the Title 24 compliance verification that is part of the final approval process. A HERS rater or energy consultant typically verifies these details, but photographic documentation adds an additional layer of permanent record.
How to Take Documentation Photos That Are Actually Useful
Not all construction photos deliver equal value. The gap between useful documentation and photos that tell you nothing is specificity.
Wide Shots of Every Room
Begin with a wide-angle photo of each room or area, capturing the full wall or ceiling section. Include a label — a whiteboard, a sticky note, or a digital overlay — identifying the room, the wall orientation (north, south, east, west), and the date. This establishes the context needed to make sense of the close-up photos that follow.
Close-Ups With a Tape Measure for Scale
For every pipe, wire, duct, junction box, valve, cleanout, or connection point, take a close-up photo with a tape measure visible in the frame. Measure from the nearest fixed reference — a corner, a stud face, the subfloor, or a door frame — so the component's exact position can be reconstructed from the photo alone. A photo of a pipe without a measurement reference confirms the pipe is there. A photo with a measurement tells you exactly where it is.
Video Walkthroughs With Narration
A brief video walkthrough of each room during rough-in — narrated to identify what is visible — provides spatial context that still photos alone cannot convey. Move slowly, name each system and component as the camera passes over it, and call out anything that differs from the approved plans. These walkthroughs take only minutes to produce and create a record that is easier to interpret than a large collection of individual photos.
Annotated Floor Plans
Mark up a copy of the floor plan to show as-built locations of supply lines, drains, wiring runs, duct paths, and blocking. This produces a single reference document that maps everything concealed behind the walls. In a fire rebuild where the original construction records may no longer exist, this annotated plan becomes the primary as-built reference for the life of the home.
The Pre-Wall-Closure Verification Checklist
Before insulation and drywall are installed, the following should be confirmed and documented:
- Framing inspection passed — confirmed by the local building department or authority having jurisdiction
- Plumbing rough-in inspection passed — including pressure test completion
- Electrical rough-in inspection passed — including panel, circuits, and low-voltage
- Mechanical (HVAC) rough-in inspection passed — including duct routing and equipment connections
- All deviations from approved plans recorded — with photos, measurements, and notes explaining why the change was made
- All backing and blocking locations documented — for future reference during finish installation
- Seismic hardware documented — hold-downs, strapping, anchor bolts, shear wall nailing
- Fire blocking and draft stopping verified and documented
- Equipment model and serial numbers recorded — for warranty registration and service records
- All photos organized by room, trade, and date — stored in a format that will remain accessible after the project is complete
- As-built floor plan annotations completed — showing actual installed locations of all concealed systems
Each item on this list represents information that is difficult or impossible to recover once walls are closed. Working through this checklist before drywall acts as a quality gate that protects the homeowner's investment and the integrity of the finished home.
How a Professional Reconstruction Contractor Manages This Process
In a well-run fire damage rebuild, rough-in documentation is not an afterthought or an optional favor — it is a built-in part of the construction operation.
At 1st Choice Development, documentation is integrated into the project workflow at every phase. Our field management process includes systematic photo documentation during framing and each rough-in trade, coordinated scheduling so documentation and inspections occur before work is covered, as-built notation when installed conditions differ from the approved plans, and organized project files delivered to the homeowner as part of the final handoff.
This matters because fire rebuild projects involve multiple trades working in a defined sequence — framers, plumbers, electricians, HVAC installers — and each trade's work directly affects what comes next. A general contractor who treats documentation as part of the daily workflow can capture details that individual trade contractors may not prioritize on their own. The outcome is a complete record of the home's concealed systems, organized and available to the homeowner for the life of the property.
If you are working with any contractor on a fire rebuild, it is worth asking directly: How do you handle rough-in documentation? What records will I receive when the project is complete? What happens if the installed work deviates from the approved plans? The answers reveal a great deal about how the project will be managed from start to finish.
Frequently Asked Questions
When is the right time to document rough-ins?
Document each trade's rough-in immediately after installation is complete and before insulation or drywall covers the work. The best window is after the trade has finished and before the required inspection — or right after the inspection passes. Once insulation begins going in, the window is closed.
Does documentation replace the required rough-in inspection?
No. Photographs, videos, and as-built records supplement the inspections required by the local building department or authority having jurisdiction — they do not replace them. Inspections are a code-compliance verification carried out by the building official. Documentation is a permanent record created for the homeowner's benefit. Both are important, and they serve distinct purposes.
What should I do if the installed work deviates from the approved plans?
Field adjustments happen on virtually every construction project. A pipe shifts to clear a structural member. A duct route changes because of clearance constraints. What matters is that the deviation gets recorded — photographed, measured, noted on the as-built plan, and communicated to the project team. If the deviation is significant enough to affect code compliance, it may require a revised plan submission or an inspector's review. Your general contractor and the authority having jurisdiction should be part of that determination.
How should I store and organize rough-in documentation?
Store documentation in a format that will remain accessible years from now. Cloud-based photo storage organized by room and trade is a practical approach. Keep a copy of the annotated as-built floor plan in both digital and printed form. If your contractor provides a project documentation package at final handoff, store it alongside your other permanent home records — title documents, insurance policy, warranty information, and permit records.
Is rough-in documentation different for a fire damage rebuild compared to a standard remodel?
Yes, in several meaningful ways. In a fire rebuild, original construction records may have been lost, making the rebuild documentation the only permanent record of the home's systems. Insurance claim processes may require documented proof of completed work at each phase. The rebuilt home must meet current code requirements, which may differ from what governed the original construction — and documenting that compliance matters for final approval. The documentation scope is also broader because the entire home is being reconstructed rather than just a portion of it.
Should inspection approval cards or sign-offs be included in the documentation package?
Yes. Copies of inspection approval records — whether digital or physical — should be included in the documentation package alongside photographs and as-built records. These approvals confirm that work passed code review at each phase and provide an official record that supports the photographic documentation.
Can I handle rough-in documentation myself, or does my contractor manage it?
This depends on your contractor and your project agreement. In a professionally managed rebuild, the general contractor typically handles documentation as part of the standard project workflow. Homeowners who want to take their own supplementary photos are generally welcome to do so during scheduled walkthroughs. If documentation matters to you — and in a fire rebuild, it should — discuss how your contractor manages it before the project gets underway.
The Documentation You Capture Now Protects You for the Life of the Home
Rough-in documentation is one of the most valuable and most time-sensitive steps in any fire damage reconstruction. The window is short. The work it captures will remain hidden for decades. And the records created during that window serve your inspections, your insurance claim, your warranties, your future repairs, and your confidence that the home was rebuilt correctly behind the walls — not just in the finishes you can see.
At 1st Choice Development, we treat documentation as a standard part of every fire damage rebuild we manage in Altadena and Pacific Palisades. It is part of how we run a controlled construction operation — one accountable process from pre-construction through final handoff, with the records to support it.
If you are preparing for a fire rebuild and want to understand how we approach documentation, inspections, scheduling, and quality control at every phase, schedule a rebuild consultation with 1st Choice Development.
Questions about your rebuild?
We rebuild fire-damaged homes across Altadena and Pacific Palisades, and we are happy to talk through your situation.
Talk to us